In summary:
- Successful vertical gardening is less about horticulture and more about engineering.
- Before planting, you must solve for structural load, water management, and light availability.
- A living wall is an engineered ecosystem; understanding its physics is the key to preventing failures like leaks, rot, and collapse.
- Choosing the right system (soil, felt, or hydroponic) for your wall’s capacity is the most critical first step.
The dream of a lush, green wall in a compact urban apartment or on a small balcony is a powerful one. It promises a connection to nature, fresh herbs at your fingertips, and a stunning visual centerpiece. Online tutorials make it look easy: grab a pallet, fill it with soil, and start planting. But this simplistic view often leads to the most common failures: mysterious plant death, water damage to floors and walls, and even structural risks that are rarely discussed.
The reality is that a thriving vertical garden has less to do with a green thumb and more to do with basic engineering. It’s not a painting; it’s a living, breathing, and surprisingly heavy ecosystem. The crucial factors for success are invisible. They are the forces of gravity acting on wet soil, the principles of closed-loop hydrology that prevent leaks, and the hard science of photosynthesis in low-light conditions.
But if the secret to a successful living wall isn’t just about choosing pretty plants, what is it? The key is to stop thinking like a decorator and start thinking like an engineer. This means treating your vertical garden as a structured system. By mastering the foundational principles of water, light, and weight before you even buy your first plant, you can build a vertical garden that doesn’t just survive, but flourishes.
This guide will walk you through the critical engineering and horticultural decisions that underpin a successful vertical installation. We will cover everything from leak-proof irrigation and structural load calculations to selecting plants that thrive in the shade and transforming your small space into a productive, holistic ecosystem.
Summary: How to Install a Vertical Garden on a Small Balcony or Indoor Wall?
- Drip Irrigation: How to Water a Living Wall Without Leaking on the Floor?
- Ferns vs Succulents: Which Plants Survive Best on a North-Facing Wall?
- Pallet Gardens: How to Turn a Wooden Pallet into a Herb Wall Safely?
- Structural Load: Can Your Fence or Wall Support 50kg of Wet Soil?
- Edible Walls: How to Grow Strawberries and Lettuce Vertically?
- Borrowed Landscapes: How to Frame a View of a Tree Even in a City?
- Micro-Rewilding: Can You Rewild a Garden or Just a 5-Acre Field?
- How to Practice Holistic Ecological Stewardship on Small Holdings?
Drip Irrigation: How to Water a Living Wall Without Leaking on the Floor?
The single most common point of failure for an indoor or balcony vertical garden is water management. Overwatering leads to root rot and messy leaks, while underwatering kills plants. The solution lies in a precise, automated system: drip irrigation. This method delivers water directly to the roots, eliminating runoff and evaporation. In fact, well-designed drip irrigation systems can reduce water consumption by up to 80% compared to hand watering, making them both efficient and safe for indoor environments.
Creating a closed-loop hydrology system is the goal. This means every drop of water is accounted for. The system starts with a small pump (a simple aquarium pump often suffices) in a reservoir at the base of your wall. A timer activates the pump for a few minutes each day, sending water up a main tube to the top of your garden. From there, a network of smaller drip lines and emitters distributes the water evenly across each plant pocket. A crucial component is a catchment tray or gutter integrated into the bottom of your living wall, which collects any excess water and channels it back into the reservoir. This prevents any possibility of leaks onto your floor.
Setting up the system involves a few key steps. First, map out the path of your drip lines to ensure every plant is reached. Connect the main line from your water reservoir to the top of the structure. Attach the smaller drip lines and emitters, positioning one emitter at the base of each plant. Before adding plants, run a test cycle to check for leaks in the tubing and ensure the flow rate is adequate but not excessive. Regular inspection for clogged emitters is vital to maintaining the health of your engineered ecosystem.
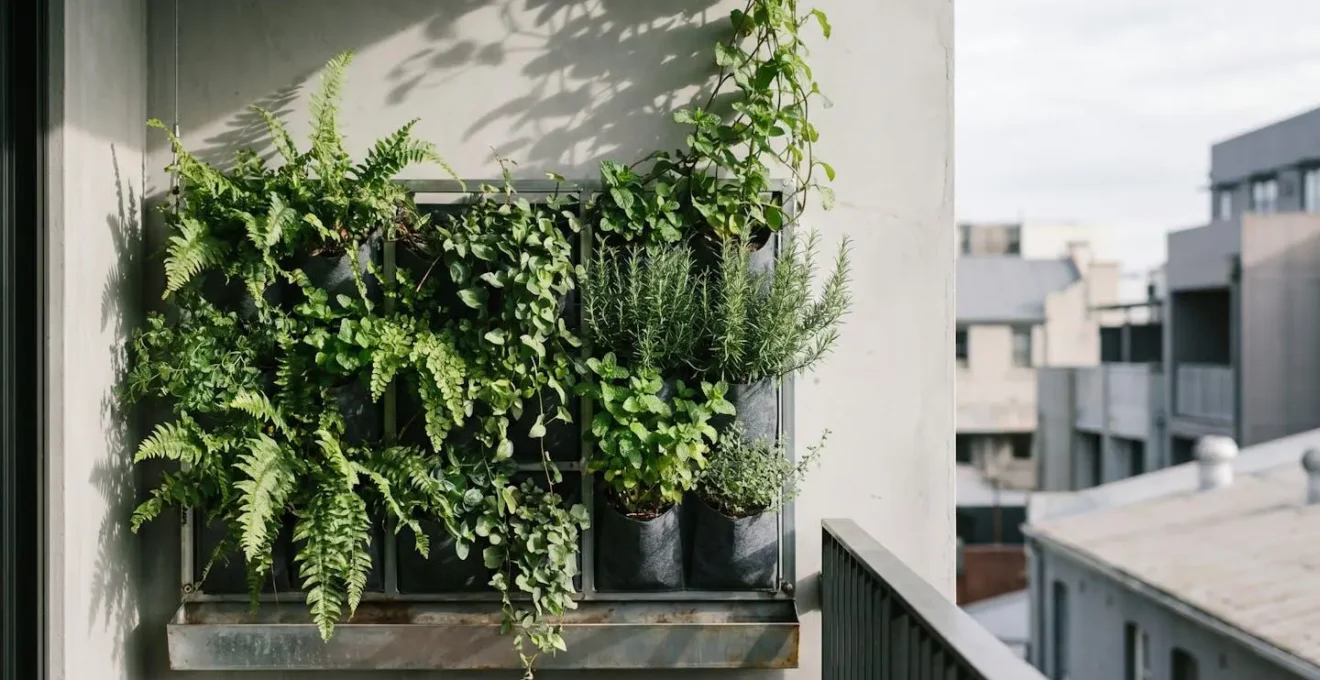
Ferns vs Succulents: Which Plants Survive Best on a North-Facing Wall?
The second major constraint, especially indoors, is light scarcity. A common mistake is trying to grow sun-loving plants like succulents or many herbs on a wall that doesn’t receive at least six hours of direct sunlight. North-facing walls, or walls shaded by other buildings, present a significant challenge. For these locations, you must choose plants that have evolved to thrive in low-light, high-humidity environments. This is where ferns and other shade-tolerant tropicals excel, while succulents would quickly etiolate and rot.
For a north-facing wall, your plant selection should focus on species from the forest understory. As the Homes & Gardens gardening experts note, some plants are exceptionally well-adapted, stating:
Boston ferns can survive with just four hours of daylight at a minimum.
– Homes & Gardens gardening experts, Houseplants for North-Facing Rooms article
This highlights the importance of matching the plant to the specific light conditions. Instead of fighting the environment, embrace it by creating a lush, jungle-like tapestry. Trailing plants like Pothos and Philodendron are excellent choices as their vines will cascade down the wall, quickly creating a full appearance. Other robust options include:
- Monstera (Swiss Cheese Plant): Tolerates low light well, but its large leaves may need a sturdy support system.
- Cast Iron Plant: Virtually indestructible and highly tolerant of neglect, making it perfect for beginners.
- ZZ Plant: A champion of low-light conditions, it’s also drought-tolerant and very forgiving.
- Peace Lily: Can produce its elegant white spathes even in the limited light of a north-facing room.
By selecting plants that naturally prefer shade, you work with your environment rather than against it. This not only ensures a higher success rate but also creates a more harmonious and sustainable indoor ecosystem. A north-facing wall isn’t a limitation; it’s an opportunity to cultivate a different kind of beauty.
Pallet Gardens: How to Turn a Wooden Pallet into a Herb Wall Safely?
Upcycled wooden pallets are a popular, low-cost entry point into vertical gardening. However, not all pallets are created equal, and using the wrong one can expose your edible plants—and yourself—to harmful chemicals. The “MB” stamp, for instance, indicates the wood was treated with Methyl Bromide, a toxic pesticide that should never be used for gardening. The key is to find pallets that have been heat-treated, not chemically treated.
Safe pallets are marked with an IPPC (International Plant Protection Convention) logo and, most importantly, the letters “HT”. This stamp certifies that the wood was heated to a core temperature of 56°C (132°F) for softwood or 60°C (140°F) for hardwood to kill pests, with no chemicals involved. This process makes the wood safe for direct contact with soil and edible plants. Sourcing from businesses that don’t handle harsh chemicals or contaminants, such as a local printer or hardware store, further reduces risk.
Once you’ve secured a safe HT pallet, the conversion is straightforward. Stand the pallet upright and staple landscape fabric to the front, bottom, and back of the slats, creating pocket-like troughs for your soil. Leave the top opening of each section accessible for planting. Reinforce the staples well, as they will be holding the weight of wet soil. This method is particularly well-suited for a compact herb garden, as most herbs have shallow root systems that fit perfectly within the pallet’s narrow openings. Ensure you use a quality potting mix, as the limited soil volume means nutrient density is critical for plant health.
Action Plan: Verifying Pallet Safety for Gardening
- Find the Stamp: Locate the IPPC (International Plant Protection Convention) logo, usually branded on the side of a pallet block.
- Check the Treatment Code: Look for the letters ‘HT’ within the stamp. This indicates it was safely Heat-Treated. Absolutely avoid any pallet stamped with ‘MB’ (Methyl Bromide).
- Inspect for Contamination: Examine the wood for any dark stains, oily residues, or chemical smells, which could indicate spills from previous cargo. Reject any pallet that isn’t clean.
- Consider the Source: Whenever possible, acquire pallets from businesses that deal in non-toxic goods, like grocery stores (for dry goods) or local hardware shops, rather than industrial chemical suppliers.
- Plan for Preparation: Even with an HT pallet, it’s good practice to thoroughly scrub the wood with soap and water and let it dry completely before use to remove any surface dirt.
Structural Load: Can Your Fence or Wall Support 50kg of Wet Soil?
This is the most overlooked and potentially dangerous aspect of vertical gardening. A living wall is not a lightweight picture frame; it’s a heavy, dynamic structure. The primary factor is the weight of the growing medium when fully saturated with water. Depending on the system, soil-based vertical gardens typically weigh between 30 to 50 kilograms per square meter. A modest 1×2 meter installation could therefore exert 100kg of downward force on your wall—a significant load that many interior partition walls or standard fences are not designed to handle.
Before you drill a single hole, you must assess your wall’s integrity. Solid masonry walls like brick or concrete are ideal and can typically support heavy soil-based systems. However, standard drywall or partition walls are often unsuitable for anything more than lightweight hydroponic or felt-based systems. For renters or those with weaker walls, a freestanding system that rests its weight on the floor is the safest and most responsible choice. It is crucial to anchor any wall-mounted system into the structural studs or masonry, not just the plasterboard.
Understanding the structural load dynamics of different systems is essential for making a safe choice. Lighter systems, while less demanding on the wall, may require more maintenance or be less suitable for plants with larger root systems. The following table provides a clear comparison of common system types and their approximate weight when saturated.
| System Type | Weight per Square Meter (Saturated) | Suitable Wall Types |
|---|---|---|
| Soil-Based Systems | 30-50 kg/m² | Brick, Concrete, RCC walls |
| Hydroponic Systems | 15-25 kg/m² | Most structural walls |
| Felt-Based Systems | 15-25 kg/m² | Most structural walls |
| Freestanding Systems | Varies (floor-supported) | Drywall, Partition walls, Rentals |
Edible Walls: How to Grow Strawberries and Lettuce Vertically?
An edible wall is the ultimate expression of urban self-sufficiency, turning a blank surface into a productive source of fresh produce. Growing edibles vertically presents unique challenges, primarily related to nutrient availability and root space. Since the soil volume per plant is limited, a nutrient-rich potting mix and regular fertilization are essential. For leafy greens and fruiting plants, a liquid organic fertilizer or compost tea applied every 2-3 weeks during the growing season is crucial for sustained production.
The choice of plants is key. Cut-and-come-again varieties like loose-leaf lettuce, arugula, and spinach are ideal because you can harvest leaves continuously without removing the whole plant. Trailing plants such as strawberries are also a perfect fit; their runners will cascade down the wall, making harvesting easy and creating a beautiful visual effect. Ensure you provide a soil depth of at least 6-8 inches to give roots adequate room to develop. Efficient watering is also paramount, as vertical farms using targeted drip irrigation can use up to 90-98% less water than traditional farming, a critical factor for resource conservation.
Implementing a companion planting strategy can naturally protect your edible wall from pests. Planting aromatic herbs like chives can help repel aphids, while marigolds are known to deter nematodes in the soil. Nasturtiums serve as an excellent “trap crop”—aphids are drawn to them, leaving your more valuable lettuces and strawberries alone. This integrated approach creates a more resilient and productive micro-ecosystem, reducing the need for chemical pesticides and fostering a healthier garden.
- Choose trailing edibles like strawberries that cascade beautifully.
- Select cut-and-come-again greens (lettuce, spinach) for continuous harvests.
- Incorporate protective herbs like chives to repel aphids and marigolds to deter soil pests.
- Use nasturtiums as a trap crop to lure pests away from your primary edibles.
- Ensure adequate soil depth (6-8 inches minimum) for healthy root development.
Borrowed Landscapes: How to Frame a View of a Tree Even in a City?
A vertical garden does not have to be an opaque wall of green that blocks the world out. A more advanced design approach is to use the garden to frame and enhance existing views—a concept known in landscape design as “shakkei,” or borrowed landscapes. Even in a dense urban environment, this technique can be used to great effect. Perhaps your balcony overlooks a single, beautiful tree in a neighboring yard, or your window has a sliver of a view of a distant park or skyline. Instead of covering this view, your vertical garden can become its frame.
The strategy is to create a “viewfinder” with your planting. This involves designing the vertical garden with intentional gaps or areas of sparser planting that align with the desired view. The structure of the garden itself directs the eye towards the distant scenery, making it a deliberate focal point. This technique is particularly effective for creating privacy screens that selectively block unsightly elements (like a neighbor’s air conditioning unit) while leaving desirable views open.
Case Study: Strategic Sparse Planting for an Urban Viewfinder
An urban vertical garden installation successfully used this concept to screen HVAC units on one side of a patio while preserving views over adjacent farmland. The designers intentionally left the central section of the vertical structure sparsely planted with shorter, less dense foliage. This created a living frame that enhanced the pastoral view beyond, turning a simple privacy screen into a dynamic design element that connected the small patio to the larger landscape.
This approach transforms the vertical garden from a simple container of plants into an interactive architectural element. It acknowledges that the garden is part of a larger environment. By carefully considering what lies beyond your wall and using your planting to curate the view, you create a much more sophisticated and integrated design. The garden becomes a tool not just for growing, but for shaping your experience of the space around you.
Micro-Rewilding: Can You Rewild a Garden or Just a 5-Acre Field?
The concept of “rewilding”—letting nature take its course—might seem suited only for vast landscapes. However, the principles can be scaled down to even the smallest of spaces, including a balcony vertical garden. Micro-rewilding is about creating a pocket of biodiversity that supports local wildlife, particularly pollinators like bees and butterflies. A vertical garden, with its concentration of flowering plants, can become a vital refueling station for these creatures in an urban “food desert.”
The key is to select native plants that local insects have co-evolved with. Choose species with a variety of flower shapes and sizes to cater to different pollinators—long, tubular flowers for hummingbirds and butterflies, and open-faced flowers for bees. It’s also critical to plan for continuous blooms from spring through fall to provide a consistent food source. Even a simple, shallow dish of water with pebbles at the base of the garden can serve as a safe drinking spot for bees, who can land on the pebbles without risk of drowning.
To truly support a healthy micro-ecosystem, you must commit to avoiding pesticides. Instead, rely on natural pest management, such as introducing beneficial insects like ladybugs to control aphids, or using the companion planting strategies discussed earlier. This approach fosters a balanced environment where a small-scale vertical garden can have an outsized ecological impact. It moves beyond simple aesthetics to actively contribute to the biodiversity of your neighborhood, proving that rewilding can start on a single square meter of wall space.
- Select native, low-light plants suitable for your specific sun exposure.
- Choose species with varied bloom times to provide continuous food sources.
- Integrate small shallow dishes with pebbles and water for bee drinking spots.
- Layer planting at different heights to create a vertical buffet for pollinators.
- Avoid all pesticides to protect beneficial insects and their predators.
Key takeaways
- A vertical garden is an engineered system; its weight and water flow must be managed before planting.
- Success in low-light urban spaces depends on choosing shade-tolerant plants like ferns, not sun-loving succulents.
- Safety is paramount: always use heat-treated (HT) pallets and anchor any wall-mounted system to structural supports, not just drywall.
How to Practice Holistic Ecological Stewardship on Small Holdings?
A vertical garden can be more than just a decorative feature or a food source; it can be a model of holistic ecological stewardship. This means viewing your small garden as a complete, closed-loop system where waste is minimized and resources are cycled. It’s a shift in mindset from being a consumer of garden supplies to a curator of a self-sustaining ecosystem. This practice is not reserved for large properties; it is perfectly achievable on a small balcony.
The first step is to “close the loop” between your kitchen and your garden. With a small-space composting system like a Bokashi bin or a mini worm farm, you can transform kitchen scraps into nutrient-rich compost and “compost tea.” This organic material becomes the primary source of fertilizer for your vertical garden, eliminating the need to purchase synthetic products. This process not only reduces landfill waste but also builds healthier, more resilient soil for your plants.
Case Study: Ecological Stewardship in Modern Garden Systems
Modern vertical garden systems are increasingly designed with stewardship in mind. Many now incorporate locally sourced recycled materials in their construction. They are engineered for highly efficient drip irrigation, generating far less water waste than even some hydroponic alternatives. By design, these systems prevent the root rot common in traditional containers and allow almost any space—urban, suburban, or rural—to become productive, demonstrating that ecological principles can be integrated directly into product design.
This holistic approach extends to material choices and seasonal planning. Opting for durable, reusable systems over single-use plastics contributes to the garden’s sustainability. Practicing seasonal plant rotation, where you replace spent plants and replenish the soil with your own compost, mimics natural cycles. By integrating these practices, your vertical garden becomes a powerful daily exercise in ecological responsibility, proving that you don’t need acres of land to be a good steward of the environment.
By treating your vertical garden as an engineered ecosystem from the start, you set the stage for a thriving, sustainable, and beautiful addition to your home. Begin today by assessing your wall’s capacity and planning your closed-loop water system.